
Other post on this project: Spiderweb Quilt Pt. 1.
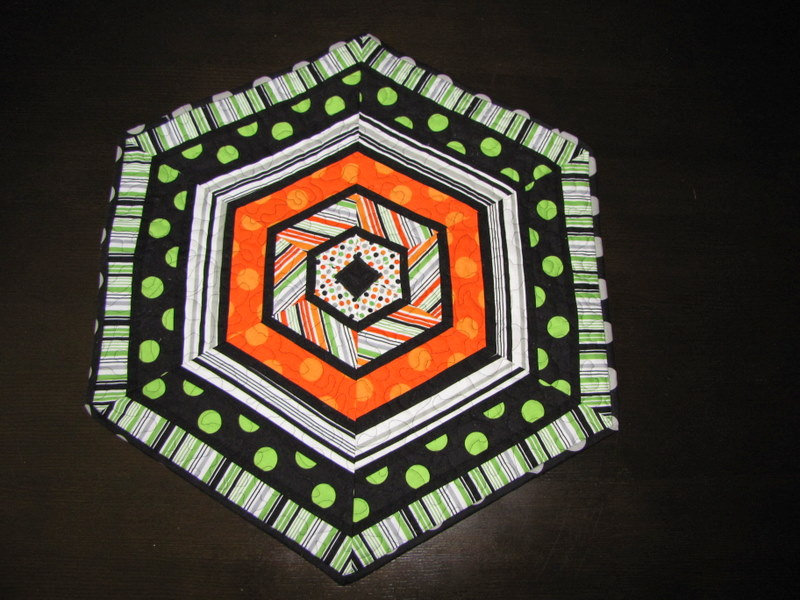
It’s all finished, and I’m so in love with it. It’s on my dining room table this month. What do you think?
I’ve written up a tutorial for this project, so here we go:
This quilt measures apprx. 24″ x 24″. Thanks to Adam for working out the trigonometry for this one!
You will need:
- 7 patterned fat quarters for the hexagon layers and binding (I used BOO! TO YOU! by My Mind’s Eye from Riley Blake)
- 1 fat quarter of black fabric for the sashing
- 1 yd of fabric for the backing (I used a print from Authentic by Moda
- Black thread (I used white thread in this tutorial for contrast)
- Crib size batting
- Ruler with a 60 degree marking
Let’s call the green stripe fabric in the outermost layer Fabric A. Working towards the center, the green dot fabric is B, the black and white stripe is C, the orange dot fabric is D, the multi stripe is E, and the polka dots in the center are F.
For fabrics A through F, all strips will be 2″ wide. All black sashing strips will be 1″ wide.
1. From Fabric A, cut 6 strips that are 2″ wide and 14 1/4″ long.

Cut 6 black strips that are 1″ wide and 14 1/4″ long to go with Fabric A.
From Fabric B and the black fabric, cut 6 strips that are 13 1/4″ long.
From Fabric C and the black fabric, cut 6 strips that are 11 1/4″ long.
From Fabric D and the black fabric, cut 6 strips that are 9 1/4″ long.
From Fabric E and the black fabric, cut 6 strips that are 7 1/4″ long.
From Fabric F cut 6 strips that are 5 1/4″ long. Cut one 2″ square from the black fabric for the center applique.
2. Sew the corresponding black strips to the strips from fabrics A through E along the length of the fabric. You should not sew any black fabric to the “F” strips. Your finished pile should now look like this:

You can now press open all the seams on these strips or, if you’re like me, you can wait and do all the pressing once they are all sewn together.
3. Now begin piecing your strips down the rows of fabrics. Center a “B” strip onto an “A” strip, lining up the black edge of “A” to the patterned edge of “B” with right sides together. Pin into place and sew down the length. Now center a “C” strip onto the “B” strip (right sides together), matching the black edge of “B” to the patterned edge of “C.” Continue on with fabrics D, E, and F, always making sure to center the next strip down and match the black fabric of the longer strip to the patterned fabric of the shorter strip. Iron all of your seams open. You should now have a hexagon segment that looks like this:

4. Now it’s time to trim this down to a proper triangle. Use the 60 degree markings on your ruler to cut from the top right edge of your segment down to the center of the bottom fabric.

5. Repeat on the left side. Match the 60 degree line to the top of your fabric, and make sure you are cutting from the very top left edge of the fabric.

Your triangle should now measure 14 1/4″ along the very top edge, and it should measure 12″ down the middle of the triangle.
6. Repeat steps 3-5 for the remaining 5 sections of your hexagon.
7. Line up your hexagon segments to form the spiderweb.

Some of my triangles came to a perfect point, some didn’t. But since I appliqued over the center, I didn’t stress out about that.
8. Pin all of your hexagon segments to each other, right sides together, doing your best to line the fabrics up to each other. Sew down the length of every side and iron the seams open.
9. Pin the black square of fabric to the center of the quilt top, aligning it how you’d like it.

10. Use a tight zigzag stitch to cover the entire edges of the square and applique it to the quilt top.

11. Make your quilt sandwich. Lay down your backing fabric with the wrong side up (I have it right side up in the photo below just to show the fabric I used). Tape it down if you need to so it stays taut under the top 2 layers.

Lay the batting on top of the backing fabric, then lay the quilt top on top of that. Make sure the top is aligned to the backing fabric’s print if it’s a pattern that goes in a certain direction (mine wasn’t). Pin the 3 layers together, starting at the center and working your way out in a circular pattern. Pull the quilt as you go to make sure the layers are straight and smooth all the way through. Trim the excess fabric around the quilt top, leaving 4 or 5″ of batting and backing fabric.


12. Quilt it. I used a free motion pattern all over the quilt, starting from the center and working my way out on each segment of the hexagon. I quilted with the black thread, too.

13. Trim off all of the excess batting and backing once the spiderweb is quilted.

14. Make and attach the binding. Cut seven 2.5″ strips along the longest part of your 7th patterned fat quarter. This is a great tutorial from Crazy Mom Quilts for making and attaching binding, with tons of great photographs. Here is what my binding looked like once I sewed on the front edge with a 1/4″ seam:

Then I flip over the binding and clip it onto the back like this:

I make my binding 2.5″ so I know I have plenty of room when I fold it over to the back. I absolutely hate hand sewing, so with this binding sewn to the front and clipped around the back with a little room to spare, I can sew in the ditch along the front binding edge and go through all of my layers without a problem. That’s just how I like to do it.
Here’s the back of my finished Spiderweb Quilt, you can see where the black thread was sewn through on the binding.

And that’s it! I hope you enjoy it.